Rules    FAQ
User: Guest ( Register )


It is currently Thu Mar 26, 2026 12:18 am (All times are UTC - 5 hours [ DST ])


Forum locked This topic is locked, you cannot edit posts or make further replies.  [ 23 posts ]  Go to page Previous  1, 2
Author Message
 Post subject: Re: mold-making question: Lego box
PostPosted: Sat May 14, 2016 7:53 pm 

Joined: Sun May 18, 2008 10:46 am
Another hint

Image

I'm having problems with small chin air bubbles with both of these. (Originals are on the left.) I don't know if the problem is in the molds themselves, or with the casts. Hopefully everyone is OK with minor imperfections like this that a little Sculpey or green stuff will fix.

_________________
Forcefull1's Cheap Joes and Transformers
http://forcefull1.weebly.com/


Top
 Profile Customs Feedback / Brawlingness  
 
 Post subject: Re: mold-making question: Lego box
PostPosted: Sat May 14, 2016 9:38 pm 

Joined: Sat Nov 10, 2007 9:59 pm
Location: Chicago, IL
How was the head aligned in the mold? What material did you use to cast? Did you use a pressure pot? Did you tap the mold to try to get the bubbles out after filling the mold with resin?


Top
 Profile Customs Feedback / Brawlingness  
 
 Post subject: Re: mold-making question: Lego box
PostPosted: Sat May 14, 2016 9:50 pm 

Joined: Sun May 18, 2008 10:46 am
How was the head aligned in the mold? - Upside down
What material did you use to cast? - Alumilite AlumiRes RC-3
Did you use a pressure pot? - Negative
Did you tap the mold to try to get the bubbles out after filling the mold with resin? - Yes, both manually, and by pushing the molds up against a fish tank motor for a couple minutes

_________________
Forcefull1's Cheap Joes and Transformers
http://forcefull1.weebly.com/


Top
 Profile Customs Feedback / Brawlingness  
 
 Post subject: Re: mold-making question: Lego box
PostPosted: Sat May 14, 2016 10:09 pm 

Joined: Sat Nov 10, 2007 9:59 pm
Location: Chicago, IL
Ok, upside down is part of the problem. You want it to be face up in the mold box so when you pour the resin it will be face down in the mold. There will be less chance of bubbles getting stuck. If you had a pressure pot you could get away with the upside down alignment.

I started out with the fast setting alumilte resins but I've had much better results with smooth on. You want to use a slow curing resin. This will give you time to get the resin in the mold and the bubbles out even if you don't have a pressure pot.

Tapping the mold on a hard surface and massaging/squeezing it will get a lot of the air bubbles out. Open and close the mold while tapping until no more bubbles come out.


Top
 Profile Customs Feedback / Brawlingness  
 
 Post subject: Re: mold-making question: Lego box
PostPosted: Sat May 14, 2016 10:28 pm 
User avatar

Joined: Mon Oct 07, 2013 3:59 pm
Location: MS
I just want one of each that you are making :) not scared to fill some holes either!


Top
 Profile Customs Feedback / Brawlingness  
 
 Post subject: Re: mold-making question: Lego box
PostPosted: Mon May 16, 2016 11:04 pm 

Joined: Sun May 18, 2008 10:46 am
Last head molds are done and tested.
If anyone wants only heads and doesn't want to wait for torsos, drop me a line.
At this point, I am asking $2.50 per head for anyone who was a paying member of Project: ARAH. Essentially, you paid for these parts already, and I'm just looking to recoup my material costs.
If you weren't a P:ARAH member, the cost is $5. The extra $2.50 will be used toward a future commission for the O-Ring Warrior Nation.
Chin bubbles continue to plague Dutch as well as the newly-completed Rambo and Cool Breeze. Luckily, putting a dab of slightly cured resin in the bubble holes largely fixes the problem.
Two minor issues with the Rambo and Cool Breeze heads. They each have tiny pieces that my skills (and probably lack of a pressure pot) can't get. Rambo's bandana cuts off where it should hang down past his hair (this wouldn't be noticeable if you didn't know to look for it). And Cool Breeze's hat brim is largely missing from his casts. But, this was a problem even for the original caster of Cool Breeze, and he used a pressure pot. So, if you're getting a Cool Breeze, expect that you'll have to sculpt a hat brim in place.

Image

_________________
Forcefull1's Cheap Joes and Transformers
http://forcefull1.weebly.com/


Top
 Profile Customs Feedback / Brawlingness  
 
 Post subject: Re: mold-making question: Lego box
PostPosted: Wed May 18, 2016 12:07 pm 

Joined: Sat Nov 10, 2007 9:59 pm
Location: Chicago, IL
Yeah, that's about as good as you can get with those materials. You need a slower curing resin (pot life 5-10 minutes, cure time 1-4 hours) if you at least want to try to have enough time to get the air bubbles out. Placement of the piece in the mold is also a huge part of avoiding air bubbles to begin with. You want to look at the part and visualize how the resin will flow in the mold. You also want to place it so that the mold lines won't be as noticeable. Usually this place will be where you won't see it once it's cast. For example, on a head you want the mold line on the back side because you will be looking at the front, the face of the head. Try to put items in the mold long ways instead of tall. In the case of the head, lay it on its side instead of standing up.

Making the mold
This is how you want to set up your parts. The head on the left is the wrong way, which will cause air bubbles. The torso is set up this way because the mold line will be in an easy to clean and hidden area when in use. Every part is different and you'll need to look at each part and decide the best way to set it up in the mold box. Now a disclaimer, I use Smooth Cast 326 for my resin (requires baking if you want the best results) and Dragonskin10 for my molds. I make envelope/one piece molds for everything. The silicon I use is really flexible when you need it to be but holds it shape very well. You might not be able to mold this way with the current materials your are using, but it's worth a shot.
Image

Pouring the resin
This is how the parts will look when you're pouring the resin. Notice how many spots the air bubbles can get caught on the head on the right.
Image

When I first started molding and casting, I went right for those "cheap" (as in no good at $30) alumilite starter kits. They had everything you needed to to do it. I got the same results you have and I was pretty much ready to give up. Lucky for me, I was given some great guidance from Dave Gray. He set me in the right direction to casting my own high quality casts. Unfortunately, in order to do it right, you have to invest in the right tools and materials. This becomes very expensive and time consuming. There is a high learning curve for molding and casting. It took me a long time (and even more money) to figure out what works for me.

Now there are so many people out there that are casting and selling less than perfect casts. It's amazing the amount of people that actually keep buying it too. At least you're up front about the quality so people know what to expect. When I was buying cast parts, it made me really upset to get a defective cast when I paid good money for a better one. That's part of the reason I wanted it to do it for myself. After all, if you want it done right...


Top
 Profile Customs Feedback / Brawlingness  
 
 Post subject: Re: mold-making question: Lego box
PostPosted: Mon May 23, 2016 9:01 pm 

Joined: Sun May 18, 2008 10:46 am
Terrific tips. Thanks, Daremo.

Torso update:
Beret Trooper torso is done and tested.
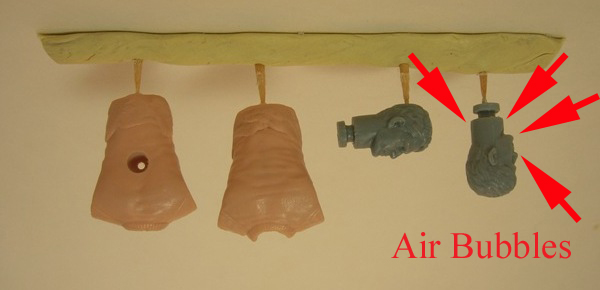
Rambo torso is done and tested (see pic below). I actually had to redo half of it as the outside had some wonky texture on it. My best guess is some Vaseline (which I used as a mold release) got onto the original and affected the contours of the mold.
Dutch torso is done, but I think I'm going to redo at least half of it. For some reason the molds halves don't line up quite right, leaving some wacky indents on the front torso.
Billy torso's second half is curing as we type. I molded the knife separately as I'm expecting it won't turn out well in the torso mold.
Cool Breeze's torso's first half is curing as we type.

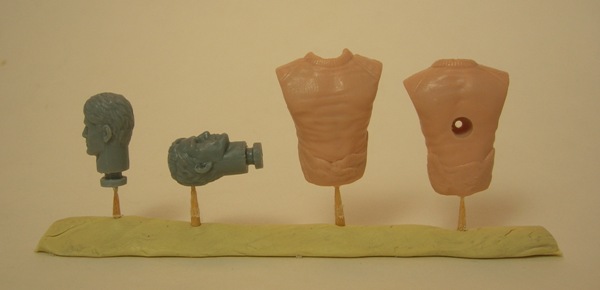
Now, with all that, I'm most excited about this. While I have not heard of anyone matching '82-'94 ARAH skin tone with resin dye, I've done the next best thing. I've matched the 2000s-era reissues skin tone! Check out Dutch's cast head and torso modeling 2001 Gung Ho's arms. No paint used whatsoever.
For future reference, the mix is 6 drops of Alumilite Caucasian dye per 10 ML of Part A resin.
If someone out there has the secret of the original ARAH skin dye mix, please advise.

Image

_________________
Forcefull1's Cheap Joes and Transformers
http://forcefull1.weebly.com/


Top
 Profile Customs Feedback / Brawlingness  
 
Display posts from previous:  Sort by  
Forum locked This topic is locked, you cannot edit posts or make further replies.  [ 23 posts ]  Go to page Previous  1, 2

It is currently Thu Mar 26, 2026 12:18 am (All times are UTC - 5 hours [ DST ])


Who is online

Users browsing this forum: No registered users and 69 guests


You cannot post new topics in this forum
You cannot reply to topics in this forum
You cannot edit your posts in this forum
You cannot delete your posts in this forum
You cannot post attachments in this forum

Powered by phpBB © 2000, 2002, 2005, 2007 phpBB Group